
Hiding the lists and libraries in quick launch menu?
When you create a new list or library, a link to that item is automatically added to the Quick Launch by default. You can change the Navigation option when you are creating a new list or library so that the item does not appear on the Quick Launch. You can also edit the option later by following these steps:
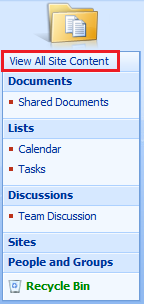
- On the Quick Launch, click View All Site Content. Then click on the name of the list of library that you would like to edit.
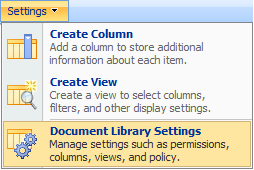
- On the Settings menu, click List Settings. Or, click the settings for the type of library that you are opening (i.e. Document Library Settings).
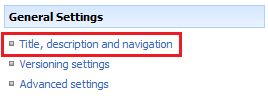
- In the General Settings column, click Title, description and navigation.
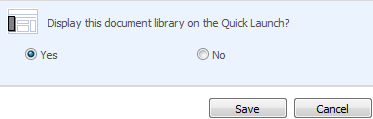
- In the Navigation section, you can remove the item from the Quick Launch by selecting No or you can add the item to the Quick Launch by selecting Yes.
- Click Save. To return to your site, click on the name of the site.
Hiding the Quick Launch in SharePoint 2010?
At times one would really feel no need of the Quick Launch section on few pages or sites i.e. the Team Site, one would really love to use the full width of the page for this one. Luckily the Content Editor Web Part trick which worked in SharePoint 2007 still works in 2010.

To hide the Quick Launch
1. Add a new Content Editor webpart. (Doesn’t matter where you add it)
2. Edit the HTML Source for the newly added Content Editor Webpart

3. In the HTML Source add the following and Click OK.

4. Save the Page. The Quick Launch section should not be visible now.
5. Edit the Just added Content Editor web Part and Under Layout Section Tick the Hidden Check box and Click OK, Which will hide the Webpart from Normal View.

6. This works on any SharePoint 2010 or Foundation 2010 Page and site.
To hide the Quick Launch
1. Add a new Content Editor webpart. (Doesn’t matter where you add it)
2. Edit the HTML Source for the newly added Content Editor Webpart
3. In the HTML Source add the following and Click OK.
#s4-leftpanel{[Do not forget to add the style open and close tag as seen in below image due to rendering issues its not showing up]
display:none
}
.s4-ca{
margin-left:0px
}
4. Save the Page. The Quick Launch section should not be visible now.
5. Edit the Just added Content Editor web Part and Under Layout Section Tick the Hidden Check box and Click OK, Which will hide the Webpart from Normal View.
6. This works on any SharePoint 2010 or Foundation 2010 Page and site.
How to activate Navigation command under Look and Feel?
The Navigation command appears under Look and Feel only if the publishing features are enabled for your site and you have the Full Control or Design permission level.


While trying to activate the “SharePoint Server Publishing” feature am getting the below error.


How to Activate a Dropdown Menu in SharePoint 2010 Sites
1. Create a SharePoint 2010 portal site.
Click on the Create Site Collection hyperlink:

Select the Publishing tab, then the Publishing Portal option, and fill in the required information on the Form:

You will see that the portal site will have been created as shown below:

2. From the root of the parent site (Home), choose to create a new site (Site 1). Once that site has been created, you will be in that new site. From here, choose to create a new page:

From Site 1, go to Site Actions -> Site Settings -> Navigation.
Select the Display the same navigation items as the parent site radio button, and check the Show subsites and Show pages checkboxes as shown below:

3. Once Site 1 has been created, choose to create another new site (Site 2). Then create a new page in Site 2:

From Site 2, go to Site Actions -> Site Settings -> Navigation.
Again select the Display the navigation items below the current site radio button, and check the Show subsites and Show pages checkboxes as shown below:

4. The end result of your efforts will be a tab in the horizontal bar for Site 1, with a vertical dropdown menu which will reveal Site 2:


Click on the Create Site Collection hyperlink:
Select the Publishing tab, then the Publishing Portal option, and fill in the required information on the Form:
You will see that the portal site will have been created as shown below:
2. From the root of the parent site (Home), choose to create a new site (Site 1). Once that site has been created, you will be in that new site. From here, choose to create a new page:
From Site 1, go to Site Actions -> Site Settings -> Navigation.
Select the Display the same navigation items as the parent site radio button, and check the Show subsites and Show pages checkboxes as shown below:
3. Once Site 1 has been created, choose to create another new site (Site 2). Then create a new page in Site 2:
From Site 2, go to Site Actions -> Site Settings -> Navigation.
Again select the Display the navigation items below the current site radio button, and check the Show subsites and Show pages checkboxes as shown below:
4. The end result of your efforts will be a tab in the horizontal bar for Site 1, with a vertical dropdown menu which will reveal Site 2:
how to copy documents from one document library to another document library whern field value changes within the site in sharepoint 2010?
Create Document library:
Note: SharePoint will only work properly in Internet Explorer.
8. create a column Document_Status as Choice field.(under development,ready for review, move to TARGET folder)
Once change the status of the field copy the documents from one documentlibrary to another location within the same site.
9.Create ListWorkflow in sharepoint designer
10.wrokflow steps:
1.if current item field equals value(condition)
2.send document set to repository(ACTION)
3.set field in current item.(ACTION)
save and publish the workflow.
11. Attach the workflow to the documentset and change the status.
How do I create a document library in SharePoint?
The following article explains how to create a document library in SharePoint. A document library is created to store a collection of documents or files that you want to share. Document libraries support features such as sub-folders, file versioning, and check-in/check-out.Note: SharePoint will only work properly in Internet Explorer.
To create a document library, please follow these steps:
- Open a web browser and log into SharePoint.
- Click Site Actions and select Create.

- Under Libraries, click Document Library.

- Enter the necessary information:
- Name: enter a name for the library
- Description: enter a description of the purpose of the library
- Navigation: click Yes if you want a link to this library to appear on the Quick Launch bar
- Document Version History: click Yes if you want a backup copy of a file to be created each time a file is checked into the library
- Document Template: specify the type of file used as a template for new files in this document library

- Click Create.
8. create a column Document_Status as Choice field.(under development,ready for review, move to TARGET folder)
Once change the status of the field copy the documents from one documentlibrary to another location within the same site.
9.Create ListWorkflow in sharepoint designer
10.wrokflow steps:
1.if current item field equals value(condition)
2.send document set to repository(ACTION)
3.set field in current item.(ACTION)
save and publish the workflow.
11. Attach the workflow to the documentset and change the status.
How to create DocumentSet in documentlibrary in sharepoint2010?
creating a Document Set in SharePoint 2010 it was actually pretty annoying to get going and really play with.
Here are the steps to create a Document Set in 2010. This is done with the beta so this can always be different when the RTM comes out. i doubt it, but I thought I would warn you.
1. You need to enable the Document Sets feature at the Site Collection level.

Now that we have this figured out we can easily go create a document set.
A Document Set is actually just a content type. This is important to know when planning out site collections because, as we know, we can add a content type to any library in the site collection now. So, what that means, is a Document Sets can only be created within a document library that is using this content type. We may have enabled Document Sets across the site collection, but really all we did is allow the use of the content type and pages that go with the set.
2. Just like in SharePoint Server 2007, we need to allow the management of content types.
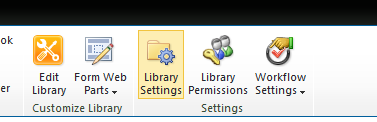
Choose the document library you would like to be able to create document sets in and click library settings on the ribbon

Then click Advanced Settings and allow the management of content types. Then click save

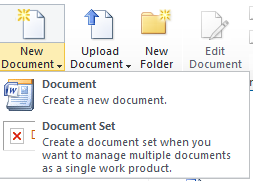
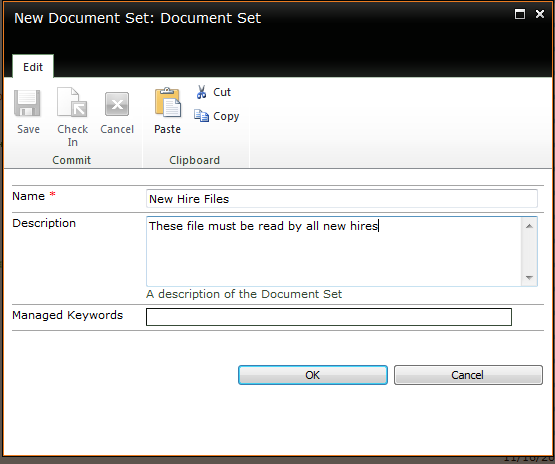
3. Create a Document Set just as you would use a content type. Go to New and choose Document Set. For whatever reason the icon seems to be missing in the beta.

4. Create a name and description for your Document Set. You might get an error if you try to add any managed metadata and this is not active in your site

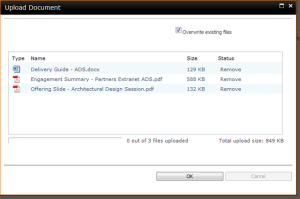
5. You add documents to your document set by choosing the Library Tools > Documents and upload multiple documents. Yes you can have only one document in a set if you need to add more later.

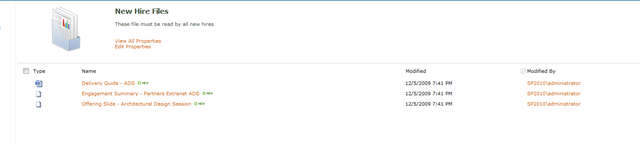
6. Drag your files you want uploaded.
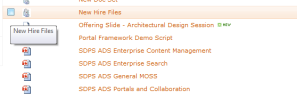
7. That is it. You now can manage your documents in a set. You can see your set within your library even when you have other documents in that library that are not in a set.

Now we can treat this Document Set as a single file or multiple files. We can delete the set and thus delete all the documents. Really we can act like it is a zip file with the ability to manage the documents within it. The documents that are part of a set are indexed individually unlike zip files so search is much better when it comes to Document Sets. Everyone will have their own reasons for creating Document Sets and I am sure you can think of a few now.
Here are the steps to create a Document Set in 2010. This is done with the beta so this can always be different when the RTM comes out. i doubt it, but I thought I would warn you.
1. You need to enable the Document Sets feature at the Site Collection level.

Now that we have this figured out we can easily go create a document set.
A Document Set is actually just a content type. This is important to know when planning out site collections because, as we know, we can add a content type to any library in the site collection now. So, what that means, is a Document Sets can only be created within a document library that is using this content type. We may have enabled Document Sets across the site collection, but really all we did is allow the use of the content type and pages that go with the set.
2. Just like in SharePoint Server 2007, we need to allow the management of content types.
Choose the document library you would like to be able to create document sets in and click library settings on the ribbon
Then click Advanced Settings and allow the management of content types. Then click save

3. Create a Document Set just as you would use a content type. Go to New and choose Document Set. For whatever reason the icon seems to be missing in the beta.
4. Create a name and description for your Document Set. You might get an error if you try to add any managed metadata and this is not active in your site
5. You add documents to your document set by choosing the Library Tools > Documents and upload multiple documents. Yes you can have only one document in a set if you need to add more later.

6. Drag your files you want uploaded.

7. That is it. You now can manage your documents in a set. You can see your set within your library even when you have other documents in that library that are not in a set.

Now we can treat this Document Set as a single file or multiple files. We can delete the set and thus delete all the documents. Really we can act like it is a zip file with the ability to manage the documents within it. The documents that are part of a set are indexed individually unlike zip files so search is much better when it comes to Document Sets. Everyone will have their own reasons for creating Document Sets and I am sure you can think of a few now.
Subscribe to:
Comments (Atom)